Configuration
When you are building a website, whether it’s a company wide site or a small personal project, you most likely have your own design guidelines, UX patterns and requirements, and would want to apply those guidelines on the things you integrate with it; charts should use your color schemes, fonts, locale, and respect any restrictions you may have on interactivity. You may also want to control how charts and themes are loaded based on whether your solution is online or offline.
You can control most of these through the Configuration object.
Temporary config
The Configuration object is an optional argument that you can provide when
instantiating the embed instance:
import { embed } from "@nebula.js/stardust";
const n = embed(enigmaApp, {  context: {    theme: "dark",  },  types: [    /* types */  ],});
n.render(/* chart 1*/);n.render(/* chart 2*/);
Reusable config
If you are working with multiple apps, or want to have multiple different configurations it might be easier for you to create the configurations first and then reuse those.
Create a baseConfig which does the heavy lifting of registering types and
themes:
const baseConfig = embed.createConfiguration({ types: [ /* register type once*/ ], themes: [ /* register themes once*/ ],});Create another configuration which inherits from the baseConfig, apply
a 'dark' theme and set a constraint to disallow selection:
const noSelectionDark = baseConfig.createConfiguration({  context: {    theme: "dark",    constraints: { select: true },  },});
// render chart with dark theme with no selections allowednoSelectionDark(enigmaApp).render(/*chart config*/);noSelectionDark(anotherEnigmaApp).render(/*chart config*/);
You can also bind the config to an app directly:
const swedishPink = baseConfig(enigmaApp, {  context: {    theme: "pinkish",    language: "sv-SE",  },});
swedishPink.render(/* chart config */);
Registering types
Before rendering a visualization, its module needs to be loaded and registered.
You can load the modules you know you need from npm:
npm install @nebula.js/sn-bar-chart @nebula.js/sn-pie-chartAnd then register each type individually:
import barchart from "@nebula.js/sn-bar-chart";import piechart from "@nebula.js/sn-pie-chart";
embed.createConfiguration({  types: [    {      name: "bar",      load: () => Promise.resolve(barchart),    },    {      name: "pie",      load: () => Promise.resolve(piechart),    },  ],});
Note: the type name is what Nebula uses to match visualizations to their data when rendering existing app objects.
Loading on the fly
If you don’t know exactly which types you need and want to avoid installing everything to reduce the size of your bundle, you could load the visualizations at runtime using a lightweight asynchronous module definitions loader like d3-require.
Start by installing the module:
npm install d3-requireand then configure it to load modules from a CDN
like https://unpkg.com, as well as specify an alias to use the local version
of @nebula.js/stardust:
import { requireFrom } from "d3-require";import * as stardust from "@nebula.js/stardust";
const loadSnType = requireFrom(  (name) => `https://unpkg.com/@nebula.js/sn-${name}-chart`).alias({  "@nebula.js/stardust": stardust,});
You can then configure all types you expect might be used:
const types = ["bar", "line", "pie", "sankey"].map((t) => ({ name: t, load: () => loadSnType(t),}));const baseConfig = stardust.embed.createConfiguration({ types });The type is loaded from the remote URL the first time you render it:
baseConfig(enigmaApp).render({ type: "bar", fields: ["Product", "=sum(Sales)"],});Sense objects
To match existing objects created in Sense, a slightly different approach is needed:
const clientNames = {  bar: "barchart",  line: "linechart",  pie: "piechart",  sankey: "qlik-sankey-chart-ext",};
const types = ["bar", "line", "pie", "sankey"].map((t) => ({  name: clientNames[t],  load: () => loadSnType(t),}));const baseConfig = stardust.embed.createConfiguration({ types });
For a full list of the type names used by Sense, see Supported Charts.
Context
When setting up the configuration you can apply a context which controls the
language, theme, and constraints in each visualization you render:
embed.createConfiguration({ context: {},});Constraints
Constraints enables you to instruct a visualization to turn off certain types of interactions and behaviour.
There are three different constraints you can apply:
passive: turn off interactions like tooltips.active: turn off interactions that affect the state of the visual representation like zoom, scroll, etc.select: turn off selections.
{ context: { constraints: { active: true, passive: true, select: true, }, },};stardust doesn’t enforce these constraints in any way, instead it’s up to
the visualization developer to respect and implement them.
Device type
The device type setting allows for instructing charts to specifically target desktop or tap devices. This becomes useful in environments where either the interaction paradigm changes, or the size and style needs to differ. Qlik sense is such an environment where the device capabilities are automatically detected or explicitly set by the user.
Supports: auto, touch or desktop
{ context: { deviceType: 'auto' },};Language
stardust supports 15 languages:
'en-US'- American English'sv-SE'- Swedish'it-IT'- Italian'zh-CN'- Simplified Chinese'zh-TW'- Traditional Chinese'ko-KR'- Korean'de-DE'- German'es-ES'- Spanish'pt-BR'- Brazilian Portuguese'ja-JP'- Japanese'fr-FR'- French'nl-NL'- Dutch'tr-TR'- Turkish'pl-PL'- Polish'ru-RU'- Russian
{ context: { language: 'sv-SE', },};Theme
There are two main themes provided out of the box: 'light' and 'dark'.
{ context: { theme: 'dark', }};| Light theme | Dark theme |
|---|---|
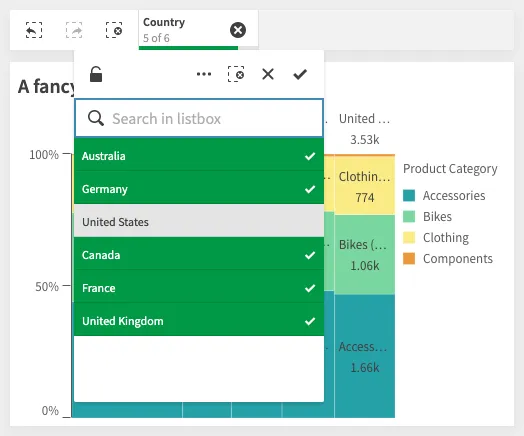 |  |
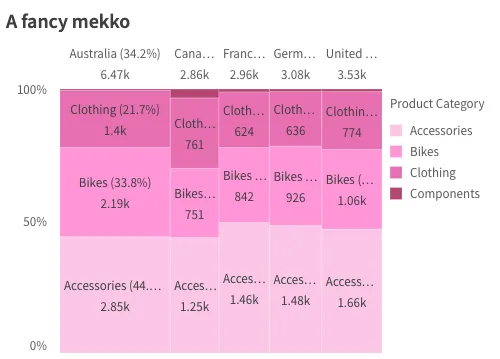
You can also register custom themes and apply one of those on the context:
{ themes: [{ id: 'pinkish', load: () => Promise.resolve({ palettes: { data: [{ scale: [ '#fac6e5', '#ff95d6', '#e76eb1', '#b44772', ], }] } }) }], context: { theme: 'pinkish' }};Here is a chart showing a color pattern based on the pinkish theme:
Learn more about themes in Applying themes.